Step 1: My Stable
Whether you have a free horse or purchased a real money horse, it’s time to race!
Go to the “My Stable” tab at the left.
Step 1.5: Name Your Horse
This will bring up a list of all the horses in your stable. Click on your horse. If it isn’t yet named, name it.
Step 2: Race “On Preference”
Take note of the stars below the horse’s name. Again, these are its “preferences.” As you can see by these horses below, their preferences are right-turning dirt tracks.
One horse likes a FIRM track, while another likes a SOFT track. You usually want to race on preference as it may give you an edge over the competition, at least until you delve deeper into the many strategies.

Step 3: Selecting a Race
Now that we know our horse’s preferences, let’s select a race. The more advanced way is via the races tab at the left but this quickstart guide will focus on how we suggest new players select races.
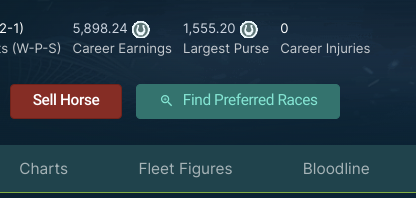
Go to the horse you want to race and click the “Find Preferred Races” button. This will automatically filter for races that match your horse’s turn and surface preferences.
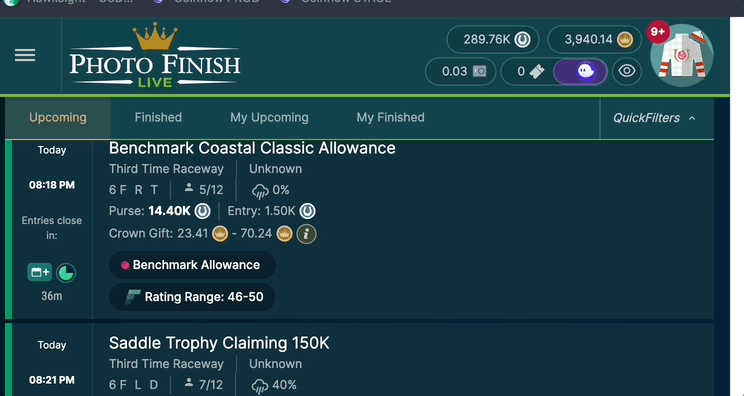
Step 4: Weather + Surface Conditions
You’ll see a list of upcoming races that fit your horse’s turn and surface preferences, but now we need to find races that fit its track condition (firm or soft) preference. Notice the weather icons and percentages?
If a horse likes soft tracks, most of the time, you want to select one where there is a 60% or higher chance of rain. If your horse likes firm tracks, do the opposite.
Think of conditions this way:
– Fast: biggest advantage for horses that prefer Firm
– Good: slight advantage for horses that prefer Firm
– Yielding: no advantage for any horses
– Soft: slight advantage for horses that prefer Soft
– Sloppy: The biggest advantage for horses that prefer Soft
Step 5: Selecting Race Types
Selecting an optimal race type is critical to your horse’s potential success.
You’ll notice DISTANCES for each race (in furlongs) as each horse has a preferred “Distance Preference.”
You’ll need to race your horse at various distances and pay attention to how it performs in the race, the charts, and its “Fleet Figures” to determine the distance it prefers.
For example, some horses may prefer 4-6 furlong races while others prefer long 10-12 furlong races. And some horses may have a specific furlong they excel at and struggle everywhere else. Every horse is different.
You’ll also notice different race types to choose from. Let’s break those down.
Graded Stakes (I, II, III)
These are the high-stakes races. Grade I is more expensive than Grade III. They cost more to enter, and the purses are big. You probably want to avoid these if you don’t have an S- to S+ grade horse.
But if you are ready for the big time with your high-grade horse, prepare for some heart-pounding action!
Restricted Stakes
These races are similar to stakes races above, except they have certain “restrictions”. They may only allow certain grade horses or racers with a certain maximum rating.
Understanding restrictions is extremely important for most racers, as it’s a great place to find competitive action without being automatically beaten up by the best horses in the game. Click on the “Reqs” button to see the specific restrictions for each race.
Make sure you pay attention, as you can accidentally have your B horse join a grade-restricted race that allows all the way up to S- horses to enter if you’re not careful, or you can enter your horse that’s running 50 Fleet Figures on average up against ones running 80’s.
Maiden
Your horse can race in these until its first win. Be careful: unless the race is Grade Restricted, your B or A horse may run against an S horse that has never won.
Handicap
Stronger horses with high preferences tend to do well in these races. Horses will have weight added to them to even the field a bit. For example, this often allows A horses to compete with S horses.
Allowance
Races with specific registration criteria such as “Must have less than X wins” and criteria that cause your horse to carry extra weight, thus slowing it down to even the field.
All horse grades can do well here, but it’s usually not a good idea to enter if your horse’s grade is below what is listed (for example, racing an A- in an A to S- Allowance).
Claimers
Races where people may “claim” your horse if they like it by paying a race-specific price. Currently, claiming race tiers are 10,000 to 250,000 DERBY, so pay careful attention to the amounts.
Claiming races tend to even fields quite well. For example, no powerful S horse would run in a 40,000 $DERBY claimer as they’re worth much more than that. So, study past claiming races by going to the “Races” tab and then to the “Finished” tab and filtering for them.
Your prized horse could be claimed. So, only race here if you’re ok with your horse being sold at the claiming price! Check out this community guide to Claiming Races if you want to learn more.
Juvenile
There are races of each type for juveniles (two-year-olds) as they don’t race with any other age group.
Benchmark Restricted Stakes
Benchmark Restricted Stakes are races with a set maximum benchmark limit.
Horses within a specified performance range can compete with no weight adjustments.
This system allows for fair competition as horses with similar performance can race against each other, and a horse with a lower benchmark can outperform one with a higher benchmark.
The aim is to provide a competitive field where owners can enter their horses based on benchmarks of their past competitiveness.
Benchmark Allowances
Benchmark Allowances are an even more specialized race that widens the competitive field while providing more races to enter and, hopefully, dominate.
These races assign additional weights to horses within a specific Benchmark band. This method is used to level the playing field, particularly in races with insufficient horses at the lower end of the benchmark spectrum, to create a competitive race.
Here are some popular race paths for various grades:
B horses: Grade restricted maiden until you win > grade or benchmark restricted races > grade restricted handicap (if your horse is particularly strong). If your horse doesn’t do well in these, then very cheap Claiming races.
A horses: Grade restricted maiden until you win > grade or benchmark restricted races > grade restricted handicap (if your horse is particularly strong) > grade restricted stakes > stakes. If your horse doesn’t do well in any of these, then Claiming races.
S- horses: Maiden until you win > allowances > handicaps > stakes > Grade III > Grade II > Grade I. If your horse doesn’t do well in any of these, then high price Claiming races.
S and above: Maiden until you win > S to A+ Allowance Races, Stakes Races, Grade III > Grade II > Grade I. If your horse doesn’t do well in any of these, then high price Claiming races.
Step 6: Register Your Horse
Register your horse in a race you think it’ll do well in, note the time, and come back later to watch it race. If you miss the race, you can always watch a replay. Notice that you can add any race directly to your calendar for ease of use!
TIP: You will receive some CROWN (the cryptocurrency token of the ecosystem) as a gift for entering EVERY race. These gifts can add up and improve your profitability drastically. For a blog on how this works, please click here.
Step 7: Analyze Your Results
After the race, it’s time to do some analysis! First, if you didn’t watch your race, watch a replay. Observe how your horse runs. Did it start well and then fall back after 8 furlongs? Maybe it needs shorter races. Did it start slow and was starting to pick up steam at the 9-furlong mark as the race ended? Maybe it prefers 10–12 furlong races.
The “charts” tab is your friend for all sorts of data on your horse.
You can also purchase a “race report” for 400 DERBY in the race result screen, providing insight into how your horse ran.
TIP: If you own 5 PFPs and link your account to a verified Discord account, you get race reports for free.
Click on your horse and check the “Fleet Figures” tab. Does it give any hint on how you might better race your horse?
The first number is your average and will be used for Benchmark Races.
This number is especially good for monitoring your horse’s racing over time, as every horse has a hidden “peak age” where they perform best.
The graph on the page visually represents how the horse’s Fleet Figure changes over time.
The Fleet Figure can help you see trends forming so you can make good financial decisions.
This number is especially good for monitoring your horse’s racing over time as every Gen 1 and later horse has a hidden “peak age” where they perform best. For example, you can see the below horse peaked early and was dominant. But as he aged, his fleet figure slowly declined to the point he was no longer very competitive and retired.
The Fleet Figure can help you see trends forming so you can make good financial decisions.
The other three Fleet Figure numbers are where the horse was at the race’s start, middle, and end.
That helps give you hints to its preferred distance. And make no mistake, your horse has a preferred distance! For example, if you’re running a lot of 10–12 furlong races and you see these kinds of numbers:
1,3,7
2,2,8
1,4,11
That tells you that the horse is getting tired toward the end of the race. Try shorter races.
TIP – Once you’ve figured out your horse’s Distance Preference on the list of races page, create and save a filter with its minimum and maximum furlong preference so you can sort for them to make race selection easier.
Step 8: Rest Your Horse
Your horse will now be “exhausted” for 20 hours and cannot race. You can enter it in races during this time as long as the race starts after it’s done being exhausted. After the 20 hours, there is an additional four hours of “recovering.” If you race before it is “fully recovered,” there MAY be a chance of injury. Here’s the breakdown:
- They cannot be injured if they are 2–3 years old and you wait the full 24 hours.
- If they are four years old and you wait the full 24 hours, the risk of injury is very low.
- If they are 5–8 years old and you wait the full 24 hours, there is a small but growing risk of injury.
- If you do not wait the full 24 hours, every age of a horse can be injured.
- When not fully rested, racing does not affect the horse’s performance on the track; it only affects its injury chances.
If a horse is injured, you have to pay a vet bill and then wait a couple of days for it to be able to race again.
Important Notes
- “Seasons” are four real-life weeks long. Your horse’s ages one year per season.
- Your horse must be retired to breed. Once retired, it can no longer race, so when to retire is a highly strategic decision. Horses can be retired as early as age three and are forced to retire at 9.
- Your horse can breed until it dies in its early 20’s.
- Studs can breed 35 times per season and are paid for that right.
- Fillies (mares) can breed once per season and keep the foal. They must pay a stud for the right to breed.
- New foals are born on the first day of the season and can race two seasons later at age two. The breeding window opens on the second day of every season and lasts seven days.
- There is a lot of variance in breeding. You’ll get ten different foals if you breed the same stud and mare ten times.
- When you make a stud available, anyone can breed with it.
- The ecosystem began with B- to S+ horses. The best (and worst) horses in this game will be bred over time. It’s anyone’s game!
- If you own a filly and a good matching stud, you can breed “in-house”; however, there will still be an 8,000 DERBY ($100) fee.
- Breeding fees are 20%, so if you charge 4000 DERBY to breed, the buyer will pay an additional 800 DERBY.
- Breeding reports are extremely useful (this is another guide).
If you need any help, be sure to join our Community Discord chat. The community would love to meet you and help you with any problems you face.